When your computer is no longer in warranty and gives serious issues such as no longer booting up, panic can set it pretty quickly. I hadn’t even gotten to making my morning coffee yet when I hear boot chime after boot chime. My blogging life isn’t all travel, sunshine, and experiencing delicious food, as much as I like to think it is. I occasionally find myself into some hair-pulling issues.

Table of Contents
Updates for OSX High Sierra – January 2018
I’ve been told this guide is helpful for both MacOS High Sierra 10.13 and Sierra. I haven’t had this issue on High Sierra yet, so if this helps, please leave a comment confirming for everyone else.
One user commented with this fix which seems to be working for some of the more recent updates causing the rebooting loops:
I called Apple Support and they shared an easy fix with me. No Time Capsule Backup or USB drive required. If you have a Time Capsule Backup this will also work for that.
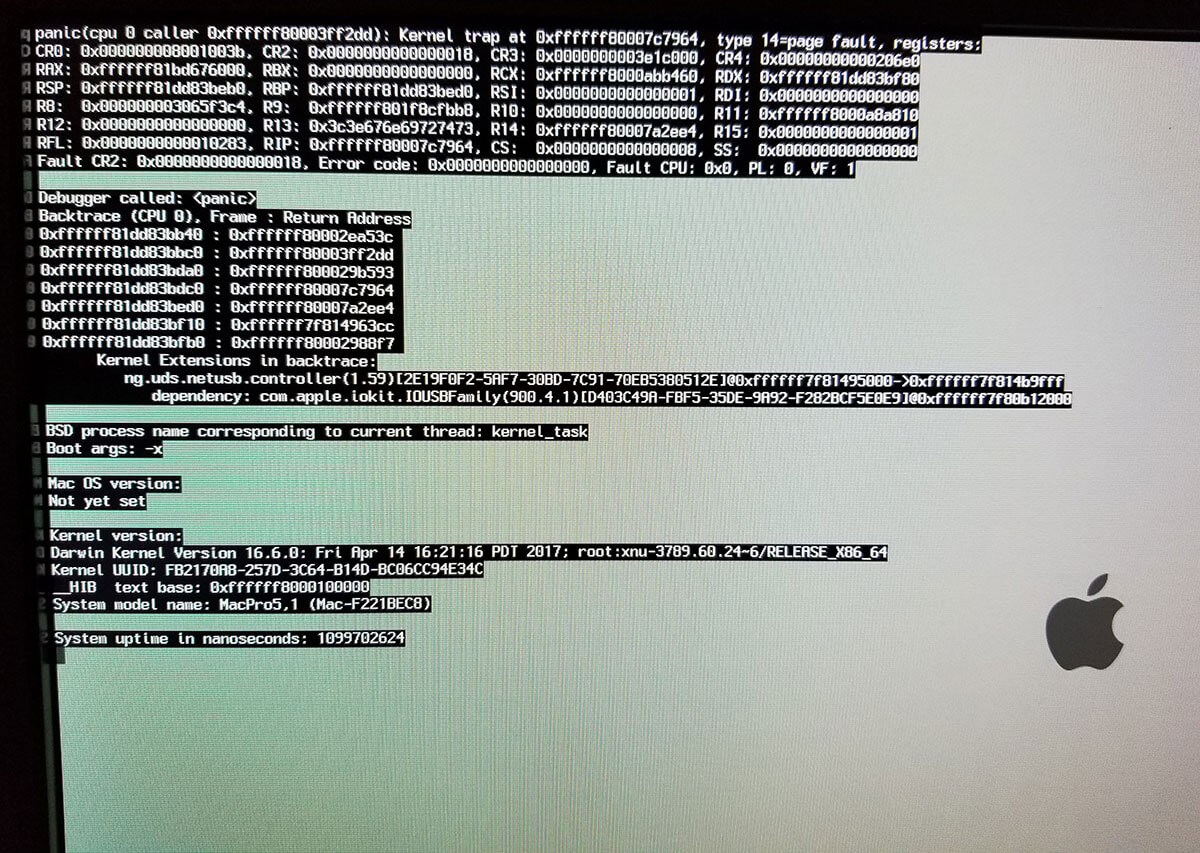
Specifically, this was after my computer restarted to install High Sierra, then froze midway, then once I powered off and on again, it became stuck on an endless reboot cycle, where it listed code saying something about ‘Kernel’ and ‘panic’.
Here are the steps:
If the computer is on, hold the power button until it shuts down completely.
Find the Command + Option + R keys. Press the power button and then quickly press and hold those keys.
Wait until you see a globe, then you can release the keys. Choose your WIFI network. Enter the password if necessary.
Then a loading bar appears and after some time the desktop will come up with a window in the center. There are four options. The first is to restore using a Backup. The second is the one you want, which is “Reinstall Mac OS”. I forget the two after that. Anyway. After choosing that, your computer will start updating to the most recent OS version.
It took about three hours for me. That’s it, now the restart bug should be gone and you should have High Sierra or the most recent OS available for your computer. All of my previous data was kept.
I turned my computer on and it began rebooting itself over and over and over and over and… you get the point. The Apple logo appears, progress bar shows zero, then the computer reboots.
For those reading this in hopes of finding a solution to your own problem, I’m running a Mac Pro 5,1 hexa-core with MacOS Sierra 10.12.5. If you are impatient and just want your computer to be back up and running, skip to Step 5 of this post for the working solution.
The stages of coping with loss and bereavement set in. First, denial. There’s no way this is happening. I’ll just leave the room, go back to bed, promptly get out of bed, and return to my office with a fresh start for the day. Second, anger. Blame Steve Jobs. Doesn’t matter he had nothing to do with this. Third, bargaining. Seek a deal with God or a higher power. In this case, Steve Jobs. Apologize for blaming him. Promise to buy a new computer…soonish? Fourth, depression. Coffee is ready, might as well fill the cup two thirds with some of my favorite Irish whiskey. Fifth, acceptance. Alright, this thing certainly doesn’t want to boot. Time to figure out how to fix this and/or talk myself into an upgrade – work certainly justifies the purchase. And finally, sixth, my favorite stage of coping – Google it.
Fixing the Reboot Loop
Step 1 – PRAM and SMC
The first step in any OSX problem is to reset the PRAM and sometimes SMC. What is the PRAM and SMC? I don’t really know and I don’t care. But it needs to be reset to fix random issues sometimes.
- Shut down computer, hold down the power button until it turns off if you have to. I like to wait until I hear fans and other things stop making noises before continuing.
- Hold down the keys command-option-p-r at the same time. If you have a fat thumb like me, you can totally hold down command and option at the same time, allowing one handed operation. You will have never felt cooler. Turn on computer with other hand. If you can’t one hand this, turn computer on then quickly get those 4 keys pressed down.
- Hold those keys down until your Mac reboots again and you hear the startup chime.
- Keep holding the keys down until you hear the chime 3 times.
- Let go of the keys and let your Mac reboot normally.
If you have external speakers hooked up, you might hear the chime through them the first time, then your computer internal speaker after that. That’s a good sign the reset did whatever it is supposed to do.
Normally, this fixes whatever issue I have encountered. However, with this particular issue, my computer was still rebooting on its own and never getting past the startup screen. Ugh.
Onto SMC resetting. These instructions vary depending on the type of Mac product you’re using.
For older Apple computers with a removable battery, such as the MacBook or MacBook Pro:
- Shut down the computer
- Disconnect MagSafe plug from the machine
- Remove the battery
- Press the power button for 5 seconds and release
- Put the battery back in and reconnect MagSafe cord
- Turn your computer back on with the power button.
For newer MacBook Pros, MacBook Airs, and MacBooks where you can’t remove the battery:
- Turn off the computer
- Keep the MagSafe adapter plugged in.
- Press at the same time shift-option-control (on the left side of the machine) and the power button
- Let go
- Turn your machine back on with the power button.
Take note that you keep the MagSafe in for computers with the built-in battery and out for computers where you can remove the battery.
For Mac Minis, Mac Pros, iMacs, and Xservers:
- Shut the machine down
- Unplug it from the power
- Press and hold the power button for 5 seconds
- Plug it back in and turn it on.
For me, this entire Step 1 process didn’t work.
Step 2 – Peripheral Devices

Some preliminary Googling revealed sometimes attached devices were the culprit. I unplugged my external drive, all the other stuff, and left the Apple keyboard plugged in. Booted up. Looping. Still. I scrolled down in the post – didn’t work for anyone else, but apparently this is a step Apple Support recommends if resetting the PRAM didn’t work.
Step 3 – Safe Mode
Hold shift to get into Safe Mode. Well, I didn’t get into Safe Mode, but I received a nice visualization of what was actually going on with the computer and what was causing it to not boot further than whatever it crashed at. This is called Kernel Panic and is a lot less interesting than it sounds.

At first glance, this means absolutely nothing to me. At second glance, it still meant nothing. I kept Googling, ignoring whatever that mumbo jumbo on the screen.
From this point, I begin wondering how capable my backup system is. Sure, it is backing up. But how will restoring go? After all, a backup is no good if it doesn’t restore correctly.
Step 4 – Boot from Install Disk
Turns out I don’t have an install disk handy, but I do have a USB flash drive. If you have a friend with a Windows computer, check out this post for instructions on getting setup. If you have a friend with another Apple laptop, these are Apple’s instructions.
I have to download macOS Sierra, and while waiting, I became impatient and moved onto the next steps. If you have more patience than me and want to try this step, here is a cumulation of processes I found which may or may not fix your problem.

Repair Disk
- Insert Bootable USB Drive into your Mac in question. Boot up in same version of the OS that you’re having the problem with if possible.
- Shut down the Mac
- Start up the Mac while holding down the “C” key
- Once started, go to Disk Utility in the Utility menu
- In Disk Utility, perform a disk repair of the Mac OS X volume. If no issues are found, do a permission repair as well.
- Restart without holding down the C key.
Note: For the following instructions in this process, I personally avoid these like the plague. I want to get back up and running as soon as possible. If I have to do a reinstall in any form, this means I am going to spend way too much time reinstalling applications and getting things setup. I go for the quickest processes first. Read on or skip to the next step.
Archive and Install
If the Disk Utility didn’t fix the reboot loop, but you’ve managed to start from the OS X Install Disk or the Bootable drive, perform the following:
- Start up the Install Disk by holding down the “C” key as described in the steps above.
- Go to Install and Restore option
- Select your language. Click Continue. Read [Or scroll as fast as possible to the bottom] license, click Continue.
- Click the volume you wish to install to
- If you don’t want to lose your data, make sure to click Options
- Select Archive and Install
- Select the Volume where the Mac OS X was already installed
- Select Preserve Users and Network Settings (to keep a safe backup of your home directory, and any other users directories where your files may have been)
- Click OK
- Click Continue for the installation to begin
To check the list of files and folders that are stored and accessible before you continue to the last and final 2 options, review this Apple Support document.
Time Machine Backup

If Archive and Install didn’t work, its time [ha] for a Time Machine backup. Which probably will cause the same issue at some point, plus you’re going to lose your latest things/changes/files/etc. This is unacceptable for me. If you run a business from your computer, this is probably unacceptable for you too.
- Insert your Mac OS X Bootable Drive
- Shut Down you Mac
- Start up using the “C” key
- Do the same steps as in the previous “Archive and Install” process. However, when the choice is given, go for the “Erase & Restore” setting.
- Set up your mac as a new one. Reconnect your Time Machine disk
- Restore from a previous backup of Time Machine where you know for a fact it was working correctly.
Again, while this step was listed as an earlier solution in my searching, this should probably be your last resort.
Step 5 – Recovery Mode into Terminal
How fortuitous I skipped over the restore steps out of impatience. Multiple people reported the issue of a reboot returning. Talk about a waste of time getting everything setup again again.
Terminal requires some basic Linux commands. I like to Google new commands and things I haven’t done before to make sure I understand what is about to happen. Here are some common commands I run into. There are tons more I never touch, but these are the commands I use quite often when troubleshooting.
- cd – change directory
- cd .. – Go up one directory
- ls – list files in current directory
- rm – remove stuff – the scariest one for me
- sudo – provides administrator capabilities to whatever you’re trying to do
- help [command] – useful in figuring out what whatever I’m doing isn’t working
- During one of the reboot loops, press Cmd-R to enter recovery mode. Release keys after you see the Apple Logo and progress bar.
- Select English as the language in the prompt.
- Don’t select a macOS Utility from the window that comes up.
- From the menu at the top, click Utilities, then Terminal. Make sure to be very specific and tyop free when using these commands. Typo intended, silly.
- cd to Volumes: cd /Volumes/
- ls to see what you have: ls
- I have several volumes/disks, so I needed to locate the correct one I booted off.
- cd to the correct volume – capitalization counts: cd /Volumes/”Disk name quotes for spaces”/
- ls to verify you are in the correct spot. You should see a bunch of folders listed instead of the volumes: ls
- cd to Caches folder: cd System/Library/Caches
- Delete everything in Caches – note, this command deletes whatever folder you are currently in, so use carefully. ls if you must to verify location: rm -fR *
- Go back one level: cd ../
- Regenerate some stuff, apparently a “pre-linked kernel: touch Extensions
- Check disk to repair any errors – there shouldn’t be any: fsck -fy
- Reboot: reboot
This didn’t appear to work initially – the suspense was killing me. Booting up took forever. Suddenly – my login screen! Yes!!!
Additional Thoughts
Now, going back – remember that photo I posted that showed the kernel panic? If you look in there, you’ll see I have:
Kernel Extensions in backrace:
ng.uds.netusb.controller (1.59 ) blah blah blah
Whatever those commands did seemed to fix the USB controller. Lots of googling shows a similar controller for other users having the same issue.
Some of the other blogs/forums I found mentioned removing stuff in /var/ folders. I can tell you from previous experience /var/ stuff should be untouched and can cause other issues.
All in all, this entire process took me almost 5 hours to figure out what would work. The last step took about 3 minutes.
If you found this post trying to fix your computer, please comment and let me know if this worked for you as well, and if it didn’t, how you fixed the issue.
If you want to show financial appreciation, use this Amazon link when shopping and I receive a small commission and you get the same great prices and fast shipping.
- About the Author
- Latest Posts
I strive to paint vivid landscapes with my words, bringing the magic of far-off lands and enchanting aromas to life for my readers. Combine passion for exploration and the art of gastronomy in an unending ode to the senses. When I’m not traversing the globe, I find solace in the earth beneath my fingertips, tending to my garden and working on projects around my verdant oasis. MK Library serves as a beacon, guiding fellow travelers and homebodies alike to embrace sustainability, nurturing both our planet and our souls with purpose. Full Bio.


Great resource!
Got stuck after ls command:
.Trashes OS Base System
entered – cd /Volumes/”OS Base System”/
then – cd /Volumes/”OS””Base””System”/
no such file or directory
appreciate any solutions, thanks again!
Greetings! My problem is with a reboot cycle happening during a clean install onto a new 1 TB SSD in an early 2014 MacBook Air. During the install of High Sierra from a bootable USB thumbdrive, the install process gets to about 2 minutes remaining, then the screen goes black and after about a minute or so, it reboots from the thumbdrive. This happens over and over again. The SSD drive has been formatted JHFS+. No disc errors. Note that this SSD drive (Aura Pro X2) requires an EFI which is only available in High Sierra or later in order to be recognized. So the italicized fix doesn’t work for me, as Internet Recovery only wants to install Mavericks (the original SSD had been upgraded to Yosemite with only 18 GB of space left on it). Not quite the same issue as you described, but maybe your steps 1, and 5 might help me get past this. Any thoughts on this situation would be appreciated.
You made my day. My 14yo had that problem and step 5 fixed it immediately.
Thanks!
Luca
Macbook Pro A1286 2011
High Sierra i think.
I had update for i tunes and Safari in which took 50mins then as mac restarted it gets stuck at logo and now continues.
Safe mode won’t come on
Recovery mode i get blue screen vertical dark lines and then back to logo endless loop.
Verbose mode worked but reboot was back to logo endless loop again.
I dont understand the verbose text flashes up to fast but took photo.
Some text about update software version non compatibility.
I dont have any backup done so need advise to identify problem and best solution as its very confusing with so many fix methods.
Wondering if I am typing in the cd /Volumes/”Disk name quotes for spaces”/ correctly. Should it be “cd /Volumes/ Macintosh HD /“?
cd /Volumes/Macintosh\ HD will work
Step 12 exactly what do we type? Do we type after quotation mark or just the bold??? So excited for potential fix!!!
Just type the text in bold: reboot
Hey there – I don’t know how old this problem (endless reboot loop) has been out there, but the italicized solution worked for me while the others did not. OPTION+COMMAND+R got me the “globe”, but then I decided to restore using time machine to a few days ago when I knew the machine worked fine. My iMac is 9 years old and support is hard to get.
It took 4.5 hours to restore (erased the hard disk as part of process) and then all I had to do was log on with my AppleID and I was all set.
Heck, for all I know my HD is now completely defragmented too….
Much obliged here by your very helpful solution list. THANK YOU!
4.5 hours is a long time, especially when you’re hoping this is the solution that works. So glad you found a method that helped you out.
Wonderful article!
I am struggling with reboot loop now, recovery mode and safe mode don’t work 🙁 I am hopeless!
THANK YOU!
I used the fix the user provided to you (shown in large italics), to successfully reload MacOS, with no loss of data, only taking approx 1 hour. (I am totally non-technical & was dreading having to go visit my IT help desk!)
This is on MacBook Pro with macOS Catalina 10.15.1.
Now back up & running & smiling!
Hope you can help. I have an Imac with a Bluetooth keyboard. Bluetooth is not working…..Can I get a wired Apple keyboard and plug it in? Will it work, or does the OS need to be functioning to see the keyboard?
I had similar issue with a late 2011 macbook pro 15″ laptop after I upgraded to the latest MacOS (high sierra). After trying all kinds of hardware diagnostics, and even replacing the hard drive, the reboot loop or grey screen persisted. I was able to solve the problem by going back to an older version of MacOS (El Capitain). It seems that high sierra has some issues with older macs. Be careful when you upgrade.
This. This is exactly what is going on with mine. Hate it.
Late 2009 iMac.
How did you go back to the older version if it was stuck on bootloop? My situation and laptop year is the same as yours. Thanks!