The Home Media Center is built to stream music, movies, and shows anywhere in my home. It works either offline or online. Anyone who connects to my WiFi can start streaming and use it.

Do not pirate. This is not how to pirate. All media has been acquired legally.
This guide is mainly written for Mac OSX and Synology users with a moderate amount of technical aptitude. Sorry to anyone else trying to figure this mess out.
Table of Contents
The Story
I love loud music and the movie theatre experience. I’ve slowly upgraded my speaker and television systems to bring me closer immersive experiences and bass that vibrates your chest.
During my process to reduce unnecessary things and clutter in my life, I converted some of my energy from CD and DVD hoarder to digital hoarder.
My morals are about to get a little flexible here. I have purchased thousands, if not tens of thousands, of CDs, tapes, vinyl, DVDs, and Blu-rays over the course of my life. The process of storing them, organizing, and finding what I want to play had become tedious. I initially turned to streaming switching back and forth from Netflix, HBO, Spotify, and Pandora.
But what happens when my internet is down? It happens often enough. What about when one of the streaming services loses rights to something I want to watch and know I own? I turned to converting my entire collection into digital storage for easier accessibility.
I realize these various labels and industries would prefer I buy individual rights for various types of enjoying devices, but after buying numerous things on Amazon and other sites and having them disappear due to changing rights, I was sick of it.
After reading numerous tutorials, downloading various programs, and lots of trial and error, I converted a huge portion of my collection to digital and stopped worrying about the physical organization.
Instead, I had movies and music scattered everywhere. I can tell how experienced I was at different stages of converting my media, based on how I labeled or where I saved it. Several times I ran out of hard drive space, which resulted in more disorganization. Finally, I sat down for a weekend and studied up on some excellent solutions.
Hardware
I initially set this whole thing up using an older desktop, but after dealing with countless hardware issues, hacking together solutions, I decided it would be worth it to convert to a Synology NAS to put everything on. As a bonus, it could hold more data, incorporate a backup solution, and would use way less energy than my space heater of a desktop computer.
Combined with my other home office networking setup, here is a list of all hardware used to make this work.
2021 Macbook Pro M1 Max – Using the equipment below for network sharing, mounted drives, and portability.
If you don’t have a desktop/laptop to use, one of the best solutions out there is the nVidia Shield Pro.
Chromecast or Roku or Apple TV or Amazon Fire TV. 4k versions recommended. This will allow any older TV to utilize newer technologies. I’m currently using Chromecast. Eventually I’ll switch to the Nvidia Shield.
A lot of newer higher end TVs will also have this functionality built in. I’m currently using a 2020 TV with AndroidTV on it, with Plex and connected to ethernet.
Synology DS418Play NAS. If I didn’t have a desktop worthy of streaming 4k, I was ready to get this unit. The goal was to have a unit that could transcode 4k 10bit 2160 UHD Dolby Atmos, to ensure it could handle whatever I threw at it.
Ok, so I actually upgraded to an 1821+, but the above linked is gonna be your best bang for the buck if you aren’t storing a bunch of photos and videos for work like myself.
QNAP QSW-1208-8C-US 12-Port Unmanaged 10GbE Switch. I wanted to get a 10GbE as I slowly upgraded systems. This was on sale at the time of purchase, and its probably overkill for now, but I love it. You need an unmanaged switch with gigabit ports – enough to handle all your devices which will plug in with ethernet.
Cat6A Cables – however many and length is needed for your own home. Cat6A is the model needed to easily plugin into 10GbE devices for future upgrades, and the price point is similar to Cat5e at this point.
Media Server & Library Setup
There are several excellent solutions out there, between Plex, Jellyfin, and a few others. In the end, I decided to choose Plex based on what was compatible with my TV and had the integrations I was looking for at the time. I currently have an install of Jellyfin setup as a backup, but am not actively using it.
One of my favorite features of Plex is the ability to click around on actor and artist names and view other media available including them. It really brings some more powerful explore features I haven’t experienced with other apps like Netflix.
Plex also includes a premium Plex Pass which brings a ton of additional media options. I recommend not buying Plex Pass until after you’ve gone through this entire process and have made sure you actually like how things are running. If you want Plex Pass features and don’t want to spend the money, look into using Jellyfin.
Installing Plex
- Create a Plex.tv account. You’ll need this to login on your computer, TV, phone, or any other device to play.
- Download Plex Server for the appropriate device. If installing on Synology, pay attention to which version.
- Install the Plex Server.
Part of the setup will have you create libraries. In advance, I created 3 partitions on one of my external hard drives.
- Movies
- TV Shows
- Music
This helped me to keep things organized from the various services I’ve purchased and downloaded music from.
I configured Plex to use libraries in each of the respective partitions for the different content. Organizing the actual media will come in a future step.
I setup each library to use content from the cloud to play trailers, show reviews, and other information about each piece of media.
Library settings:
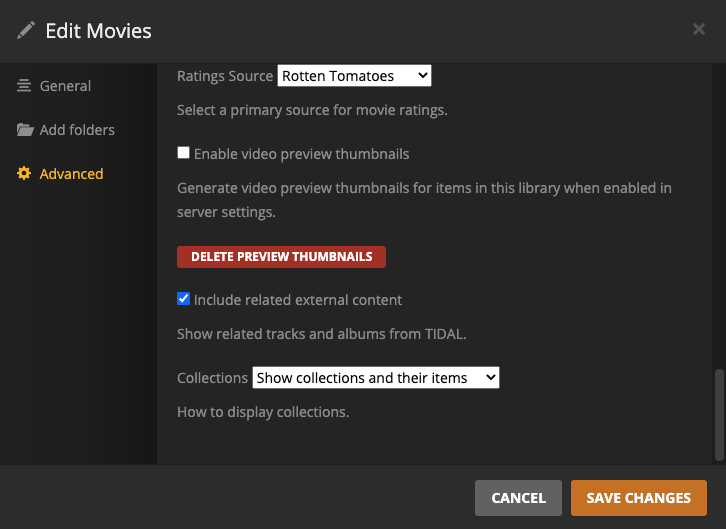


Under Plex Library settings – not just individual Libraries, I set Plex to scan for changes automatically. When the next components of setup make their changes, Plex will pick up on it automatically.
I ended up disabling video previews, as I felt like they took up too much space and weren’t really needed.
The other setting I customized for the Plex setup is disabling connectivity outside of the network. If a device isn’t on my WiFi or network, I don’t want it having access to my library. Makes security a lot easier to manage.
TV Setup for Plex
When I first began this journey, my LG TV included a Plex app. However, as of now, the app is no longer supported on my TV. I either needed a new TV or a different solution. I ended up pulling out my original Chromecast and using that. Any Chromecast or Roku will get you the same automated solution. No setup required – everything now is done through Casting. In theory Apple TV should do this, but I haven’t tested.
I installed the Plex app on my phone, logged into the account, and casted a piece of media to the Chromecast on the TV seamlessly.
To access Plex from your computer, navigate to: http://127.0.0.1:32400/
Fix: Plex Not Showing Movie Posters
After setting everything up, importing from different sources, and getting your content organized, you might find some movie posters aren’t showing up in Plex properly. The first step is to make sure your folder permissions are set correctly. They may have been copied over with different permissions and causing Plex to not read the metadata correctly.
Open Terminal and paste in these commands, one at a time. Change “/Volumes/Movies” to your own path where your Library is. Hit Enter, type in your password, and then repeat with the second command.
sudo find /Volumes/Movies -type d -exec chmod 775 '{}' ';'
sudo find /Volumes/Movies -type f -exec chmod 664 '{}' ';'
Next, open up Plex, go to your Library with the movies. At the top left, click the 3 dots, manage library, then Refresh all Metadata. In theory, this will fix most cover art/posters and other metadata that hasn’t synced up quite properly.

TV Show Organization – Sonarr
Sonarr is an amazing piece of software which will automatically scan your TV Show library, categorize, organize, pull in missing meta information, and give you ideas on other things you might like, what’s missing, and heads up about other shows release dates. It syncs with the Plex library, adding a lot of power and Netflix-like features.
I have a lot of free documentaries I’ve downloaded over the years and this has really helped organize and categorize automatically. The initial settings setup was a pain, but now that it is there, I love letting Sonarr do its thing.
Install Sonarr
These are some resources you may end up needing to help you customize Sonarr for your own personal needs. I found them invaluable in figuring out what I wanted.
Step one: Sonarr uses a framework called Mono. Go here and downloaded the latest Stable channel.
Install Mono.
Download the latest Sonarr version. Drag to your Applications folder and double click to run. You’ll notice nothing happens. That is usually a good thing.
Navigate to: http://localhost:8989/
Click over to Settings, click on Show Advanced, you’ll get a green checkmark, and now you will setup Sonarr.
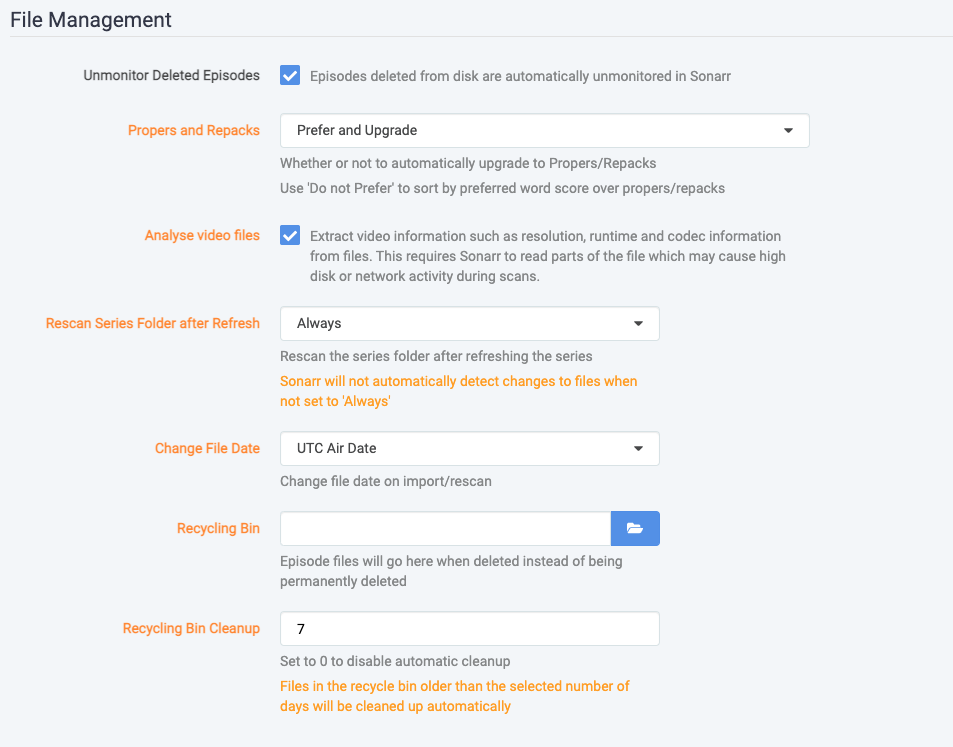
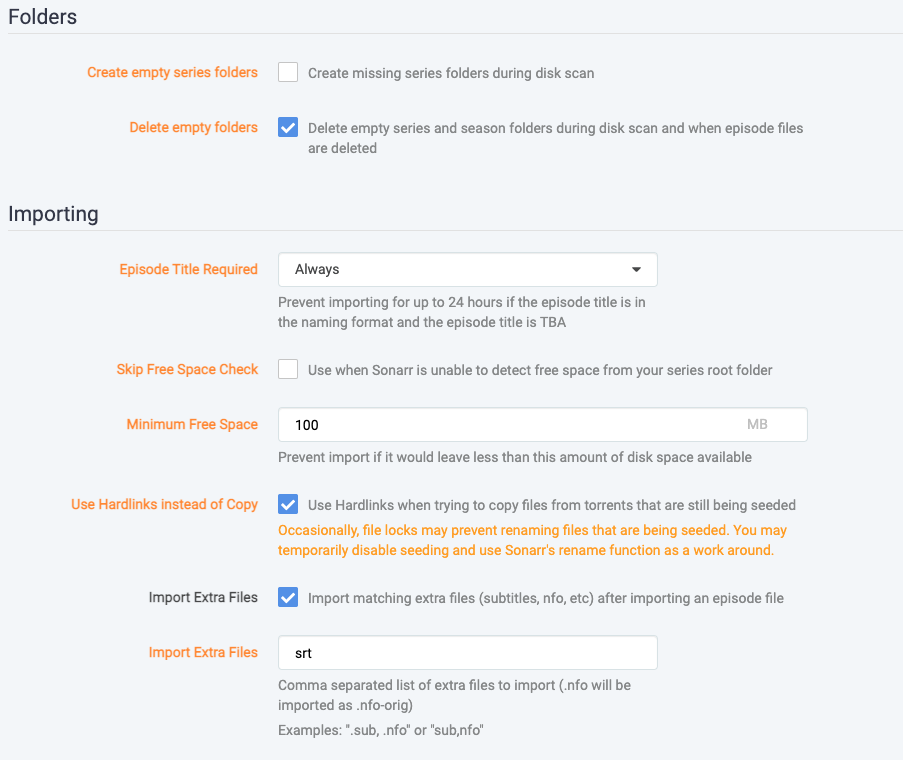
Media Management
Plex and several other systems support a more standardized naming schema to allow the different apps to pull in the correct date. You’ll notice as you paste in these values, the preview underneath will update to show you what it looks like processed and if you have any errors.
I’ve had issues in the past where Plex isn’t displaying thumbnails correctly or has some other info wrong. This corrects so many little annoyances. For all the details possible, here’s what to enter:
Standard Episode Format: {Series TitleYear} – S{season:00}E{episode:00} – {Episode CleanTitle} [{Preferred Words }{Quality Full}]{[MediaInfo VideoDynamicRange]}[{MediaInfo VideoBitDepth}bit]{[MediaInfo VideoCodec]}{[Mediainfo AudioCodec}{ Mediainfo AudioChannels]}{[MediaInfo AudioLanguages]}{-Release Group}
Daily Episode Format: {Series TitleYear} – {Air-Date} – {Episode CleanTitle} [{Preferred Words }{Quality Full}]{[MediaInfo VideoDynamicRange]}[{MediaInfo VideoBitDepth}bit]{[MediaInfo VideoCodec]}{[Mediainfo AudioCodec}{ Mediainfo AudioChannels]}{[MediaInfo AudioLanguages]}{-Release Group}
Anime Episode Format: {Series TitleYear} – {absolute:000} – S{season:00}E{episode:00} – {Episode CleanTitle} [{Preferred Words }{Quality Full}]{[MediaInfo VideoDynamicRange]}[{MediaInfo VideoBitDepth}bit]{[MediaInfo VideoCodec]}{[Mediainfo AudioCodec}{ Mediainfo AudioChannels]}{[MediaInfo AudioLanguages]}{-Release Group}
Series Folder Format: {Series TitleYear}
Season Folder Format: Season {season:00}
Multi-Episode Style: Scene
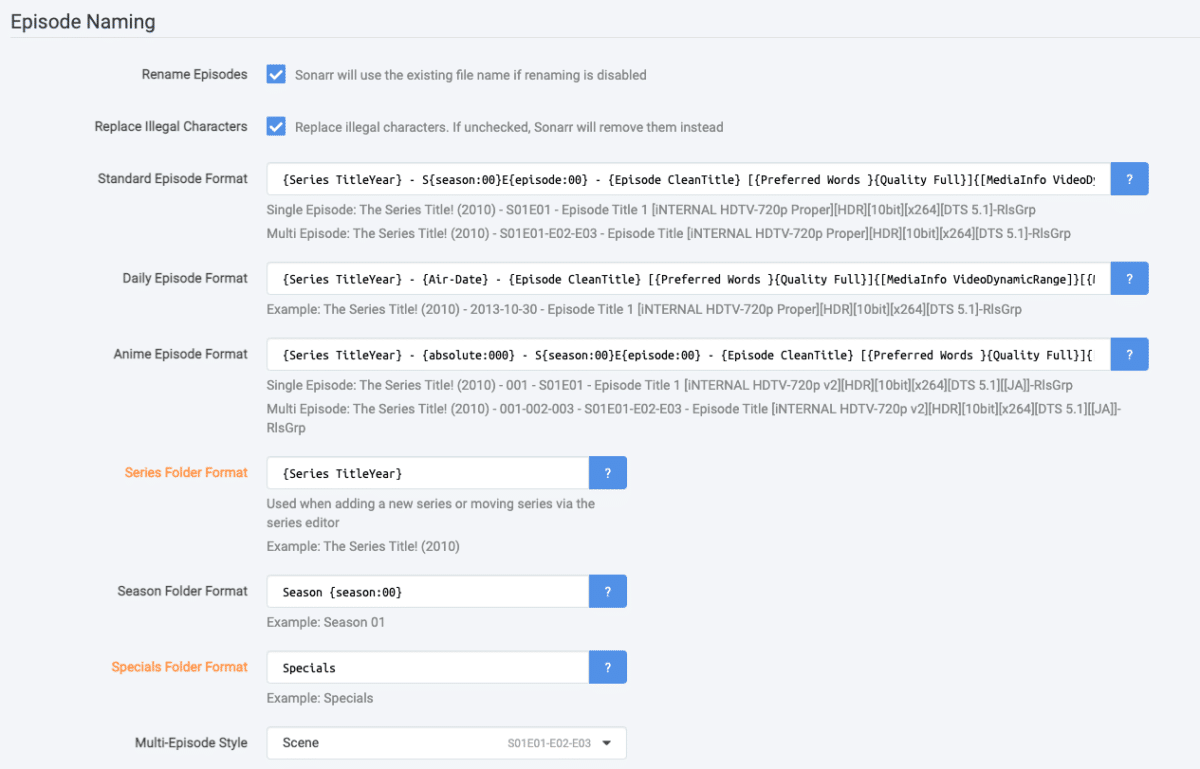
Save changes and move onto the next section.
Profiles
This section allows you to set specifications for whether or not quality of media should be upgraded or downgraded. This is entirely dependent on your own hard drive space and viewing preferences. I haven’t adjusted anything here. If you do, I recommend creating a new profile and not editing the current ones.
I did create a release profile, which gives prominence to h265 and HEVC files over larger encoding formats.

Quality
This allows you to fine tune quality settings on your media. Again, I didn’t adjust anything here.
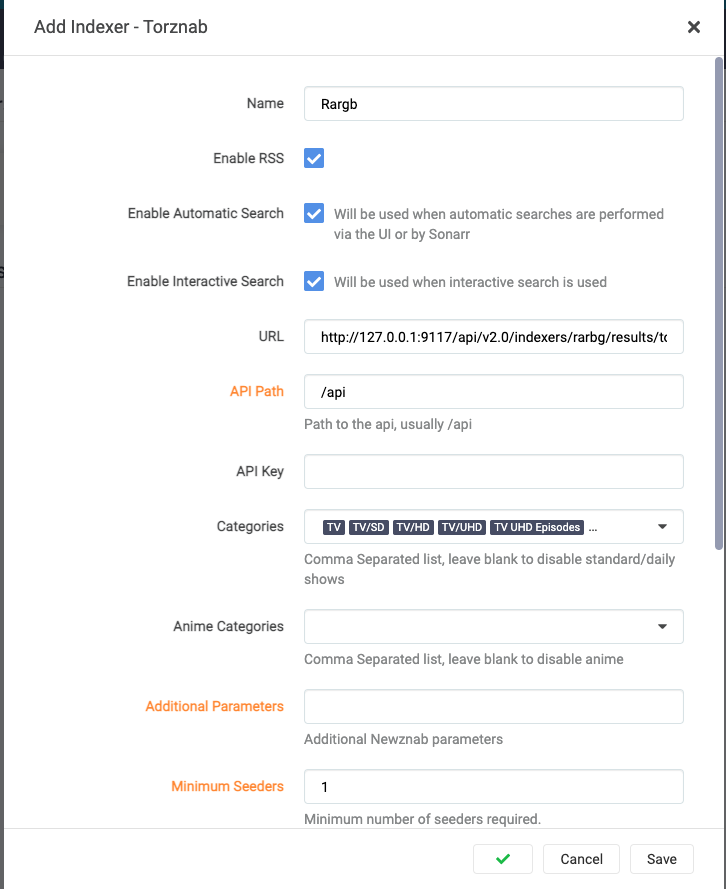
Indexers
These are some supported methods for getting your purchased TV shows. A few free documentaries have been using torrents to release their work to the public as a series. This is how I set it up for me.
Jackett
Jackett serves as a proxy server for Sonarr, Radarr, and a few others. It translates queries from these apps into http queries, parses a response, and brings it back home. Essentially allows Sonarr to talk to some places in different formats as a bridge.
- Download the latest Jackett.Binaries.macOS.tar.gz release here.
- Unzip. I opted to drag the entire Jackett folder to my Applications folder for easy reference/updating.
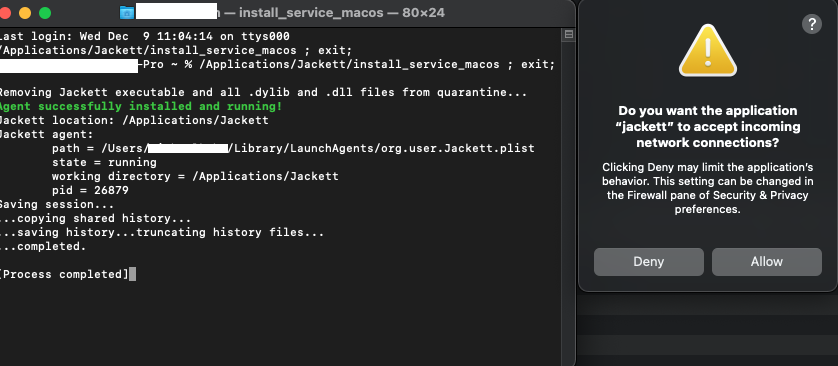
- Double click on install_service_macos to setup Jackett as an automated service. If you do not want to do this, run it with the terminal command “./jackett”.
- You’ll get a warning message about bad things potentially happening. Open Preferences, Security & Privacy, General, and click Open Anyways, assuming you understand the risk.
- Terminal will open, run some things, if you see the text in green then click Allow on the incoming network connections, you should be good to go.
Open Jackett to configure it by going to: http://127.0.0.1:9117/
Read through the Github to figure out how to configure it for your particular source. This is how I initially setup mine from the Indexers page on Sonarr:
Download Clients
I use Transmission to coordinate with Jackett/Indexers. Set your Transmission settings to allow Remote connections, only from 127.0.0.1. Require authentication depending on how secure you want to be.
Import Lists
Sonarr can automatically monitor specific series you are interested in and import them if available. It can also integrate with services like Trakt. I never set this up as it wasn’t relevant for me.
Connect
Have Sonarry send notifications to different apps you might be using. I set this to notify Plex when there are series updates for me to consider.
Metadata & Tags
These are both sections I made no changes to.
General
I set Sonarr to automatically update. No other changes were made. This is the section to setup SSL if that is your thing.
UI
Edit how you want to view dates. I left it alone.
Series
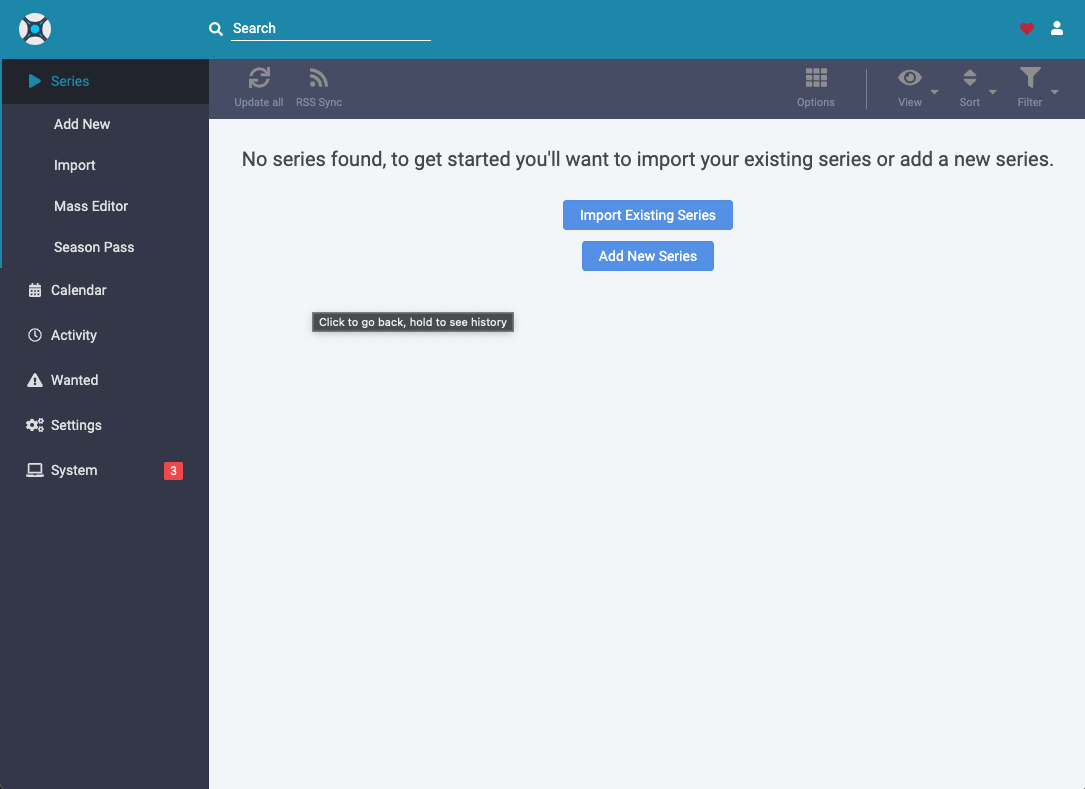
Now that your settings have all been configured, go back to the main Series page and click Import Existing Series, assuming you have selected an existing folder with TV Shows already in it.
I had to deselect my Trash and Spotlight folders. Some series did not get their correct metadata identified. This is where you fine tune all your existing content to make sure it is being categorized correctly. You can also set the quality profile for each series and if you want them monitored.
For example, I have some media that doesn’t need monitoring cause there is nothing new ever coming out, and I want quality set to h265 only.
Click Import once everything is configured and setup. Now your folders will process.
Movie Organization – Radarr
Radarr is geared to organize and gather data on movies. A fork of Sonarr, you’ll find the setup to go a lot faster after getting familiar with Sonarr. It syncs with Plex as well.
Install Radarr
These are some resources to help you figure out some advanced configurations or troubleshoot problems you may encounter along the way.
Download the latest release of Radarr on Github – get the App Core version for OSX.
Unzip and drag to your Applications folder. Double click to run – nothing will appear to happen which is normal. You already have Mono installed and setup from Sonarr.
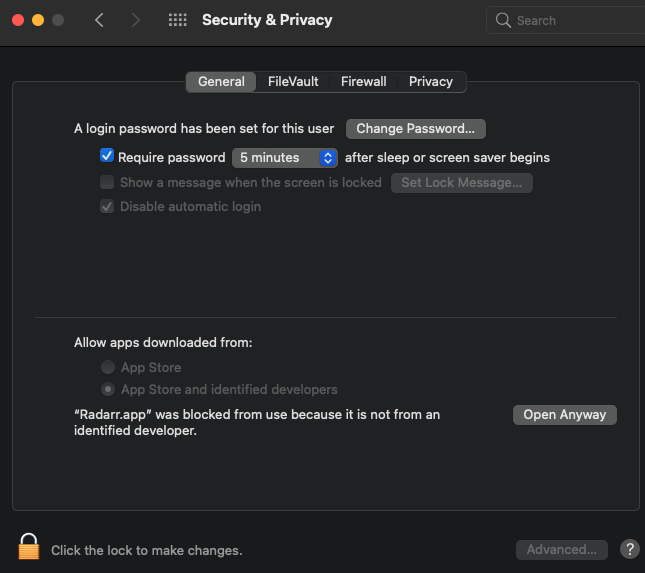
It is possible this warning will come up, ““Radarr.app” cannot be opened because it is from an unidentified developer.”
Protip: Use VirusTotal to drag and drop downloaded applications to check for viruses before running.
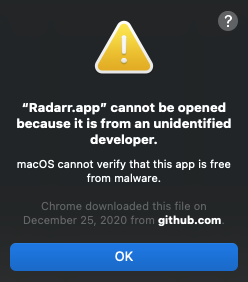
Totally fine, unless the developer’s Github was hacked, the app is safe. Head over to System Preferences, Security & Privacy, and click Open Anyway.
Navigate to: http://localhost:7878/

Select Import Existing Movies.

Click the Start Import button and navigate to where you store your movies. After you have chosen the first folder and clicked Ok, there will be a button to add additional folders.
Next, go to the settings and begin your setup.
Settings – Media Management

The best thing I ever did was let Radarr rename and manage my movie organization. I have accumulated a lot of random stuff over the years from lots of sources. Using Radarr to standardize naming and organize things has made it a lot easier to find what I want to watch.
Stick this in Standard Movie Format:
{Movie CleanTitle} {(Release Year)} {Edition Tags} [imdb-{ImdbId}]{[Custom Formats]}{[Quality Full]}{[MediaInfo 3D]}{[MediaInfo VideoDynamicRange]}[{Mediainfo VideoBitDepth}bit][{Mediainfo VideoCodec}]{[Mediainfo AudioCodec}{ Mediainfo AudioChannels}]{-Release Group}This format is compatible with the 2020 and later versions of Plex which can pull a ton more data, even if you disconnect Radarr in the future. This will also help other programs figure out what your movie is.
Custom Formats
To make it super easy, the Custom Formats has a premade release profile for 265 quality, which allowed me to replace a bunch of poorly encoded movies with a size-optimized high quality version.

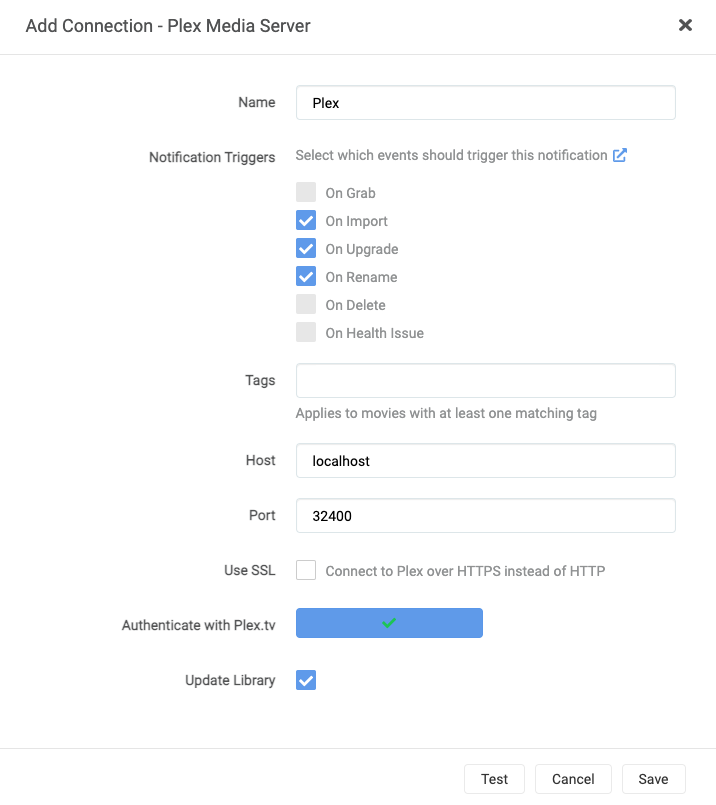
Connections
Go to Connect, Add Connection and select Plex Media server, or any other connection you want to setup. Use either localhost or your custom URL for the Host field. Authenticate with Plex.tv and you should be good to go.
For Download Clients and Indexers, I copied over my same settings from Sonarr.
You may want to adjust other settings or poke around, but the above are the only things I setup for Radarr.
Import and Organize
Once your settings are all in place, head back to Movies > Library Import and click on the blue link to the folder(s) to where your movies are. You can select which quality profile you want for each movie, if you need them monitors for updated versions, and to import and organize. Make whatever changed are needed and click Import X movies.
With everything saved and imported, you’ll probably see a bunch of notifications as Plex is updating its own library as well. Once everything has completed, you’ll be well organized and in possession of a lot more metadata to help you with a really nice media library experience when browsing Plex.
Music Organization – Sonarr
Download Sonarr here.
Drag the app to your Applications folder, double click to open, allow through Security Settings, Allow for firewall connections.
Navigate to: http://localhost:8686/
Settings – Media Management

Click on Add Root Folder, then click the big Plus sign.

I personally setup a disk partition called Music and keep all my music on there. All other settings are left to default.

Back at the Media Management page, click the checkbox for Rename Tracks. This will help standardize filenames from different services and allow for better organization.
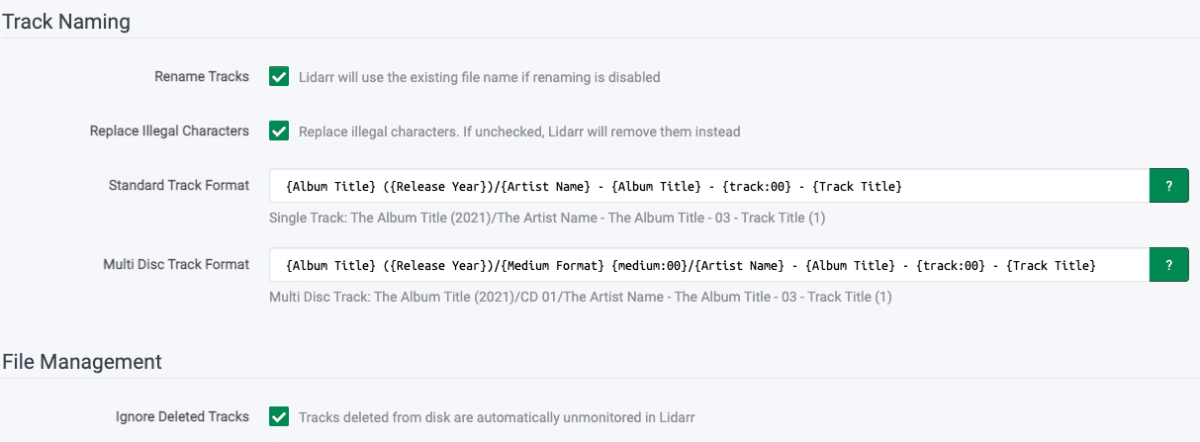
Settings – Metadata
In this section, you’ll use Lidarr to sync up MusicBrains data with compatibility with Kodi/Emby, which will also allow different music programs to properly read and categorize your music.

Organize with Collections – Plex Meta Manager
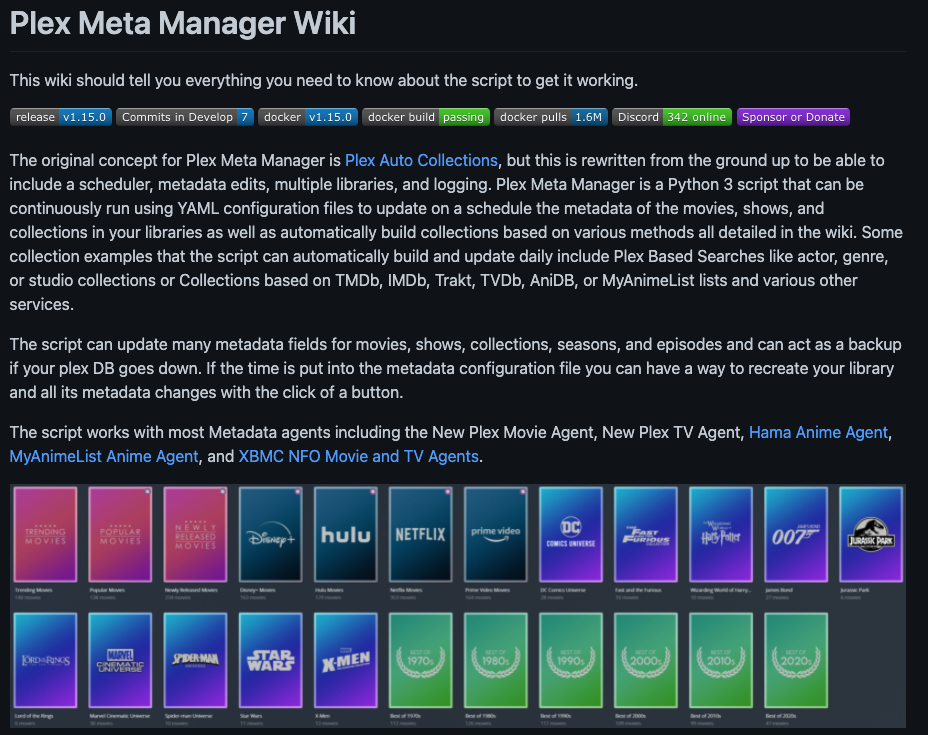
Plex Meta Manager is a python script that can automatically build collections in your Plex library. Collection examples that the script can automatically build and update daily include Plex Based Searches like actor, genre, or studio collections or Collections based on TMDb, IMDb, Trakt, TVDb, AniDB, or MyAnimeList lists and various other services.
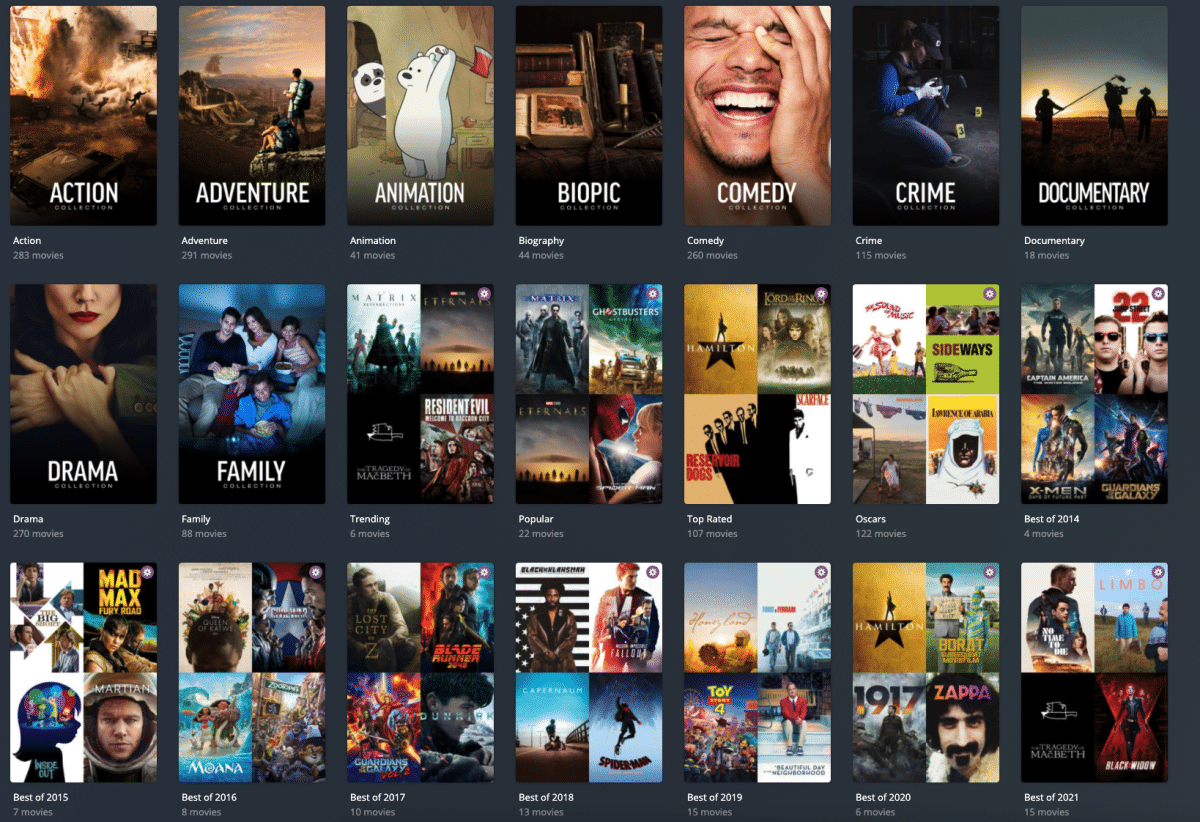
Once you have Plex setup and running, I’ve found Plex Meta Manager to be incredibly useful and has added a lot of joy to the experience. For example, I have a collection created that orders Star Wars movies in chronological order, not release date. And then something similar for the Marvel universe.
From the GitHub page, scroll down to Getting Started. I setup the script to run from my local computer, connecting to Plex on my Synology NAS. The Local Walkthrough was incredibly easy to follow along with. If you happened to setup using Docker or unRAID, there are equally great instructions for those setups too.
Once you’re setup, spend some time reviewing the Wiki and community submitted configurations to figure out which types of collections will work best for you. There is also a Discord server for fast helpful advice.
Here’s an example of some of my Collections setup:
Media Maintenance and Optimization – Tdarr

Tdarr works with Radarr and Sonarr to scan your media library and transcode and health check all of your files. Tdarr V2 is a closed-source distributed transcoding system for automating media library transcode/remux management and making sure your files are exactly how you need them to be in terms of codecs/streams/containers and so on.
Tdarr excels if your hardware has specific restraints and the sources of where you are bringing in media files are not ideal.
Some examples on how you can utilize it:
- Transcode non hevc files into hevc
- Remove subs
- Remove meta data (if title)
- Add aac stereo audio if none (eng preferred)
- Remove closed captions
Download Tdarr.
Quick Startup
As all these new apps get installed, you’ll notice they don’t startup with your system. If you want everything to open when you startup or reboot, you’ll have to add them to the login.
Open System Settings, > Users & Groups > Your Username > Login Items.

Add whichever applications you have installed and setup with this guide and enjoy your seamless experience.

- About the Author
- Latest Posts

I strive to paint vivid landscapes with my words, bringing the magic of far-off lands and enchanting aromas to life for my readers. Combine passion for exploration and the art of gastronomy in an unending ode to the senses. When I’m not traversing the globe, I find solace in the earth beneath my fingertips, tending to my garden and working on projects around my verdant oasis. MK Library serves as a beacon, guiding fellow travelers and homebodies alike to embrace sustainability, nurturing both our planet and our souls with purpose. Full Bio.