Installing plumbing in a tiny house is not as difficult as it may seem.
I’m going to show you how we installed the supply water lines and gray water lines for our house, as well as list all of the products we used and our reasoning behind our decisions. This post will cover the tiny house plumbing for the supply water lines and plumbing inside the house. See this post for our gray water disposal plumbing.
Let me start by saying I’m not a plumber, but if you require a plumber try plumber newmarket. I did my own research to come to these decisions and then installed all of the plumbing myself. If you’re not comfortable with installing your own tiny house plumbing, please hire a professional! The good news is that PEX tubing is almost fool-proof and leak-proof, so you really should feel confident about giving it a whirl yourself. After I was done I couldn’t believe how easy it was!
After much research, I determined that having pipes mounted under the trailer or inside the exterior walls was a bad idea. I didn’t want them mounted under the trailer because although PEX tubing is very strong, it’s also plastic and I didn’t want to take the chance that when we move the house we might damage the pipes. As for the exterior walls, my research indicated that all plumbing should be done only on interior walls to help protect the pipes from freezing. As many tiny houses have very limited interior walls, this was going to be a challenge.
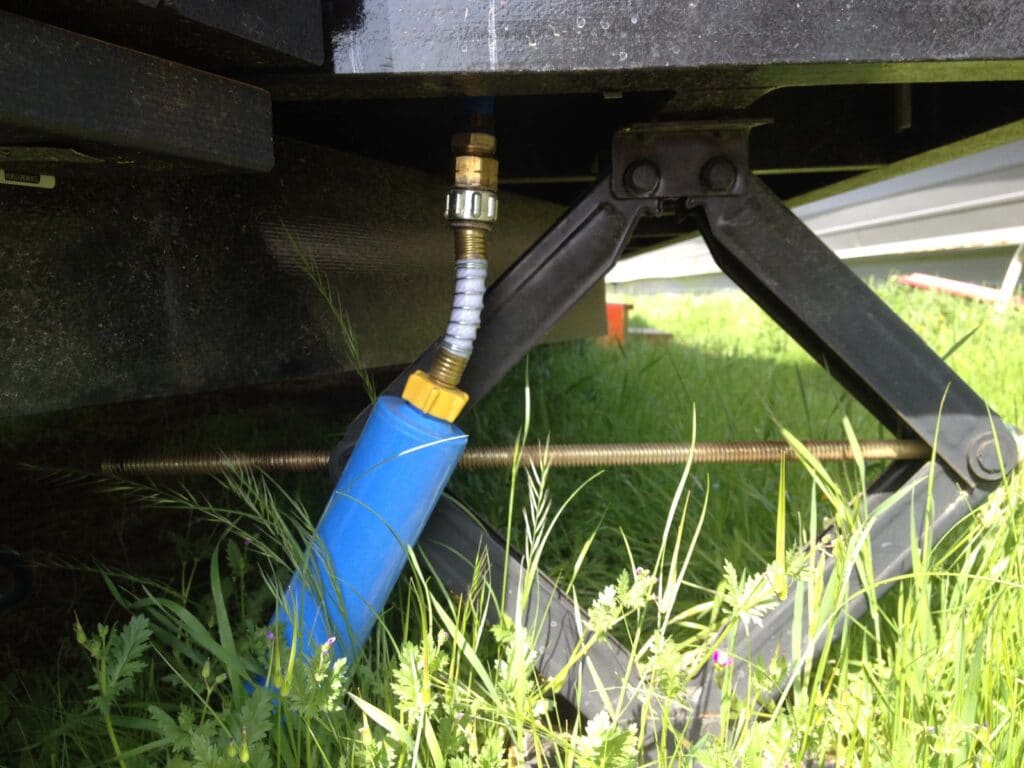
Based on that philosophy, we chose to run a potable water hose from a hose bib that you would find on the exterior of a house on a foundation all the way to our tiny house. We also chose to get this in line water filter to help remove any items in the water that might cause damage to the tankless water heater. This all feeds to a spot under the house near the kitchen sink at the tongue of our trailer.

Here’s how we did it:
Approximately 4″ inward from the exterior wall (towards the interior of the house, not the exterior), we drilled a 1 1/2″ hole through our subfloor. We then fed a piece of 3/4″ PEX tubing down through the hole, allowing it to protrude on the underside of the trailer (maybe 5″). On the end on the underside of the trailer we affixed a garden hose swivel connector to attach the potable water hose. On the inside of the house, we allowed the tubing to extend approximately 12″ above the finished subfloor, and then we connected it to a ball valve.
This ball valve is very important as it’s the main water shut off for our entire house, from the INSIDE of our house. This means if there’s some emergency (a pipe bursts or what have you), I don’t have to run outside to the main water supply (or the main house’s hose bib) in order to turn off the water.
After consulting the plumbing experts working at Wilson Plumbing, Heating, Cooling, and Electric, I learned that a shut-off valve is crucial for tiny house plumbing. Further, we chose to install this ball valve so that it runs parallel to the house. This allows us to install cabinets or shelving along that same wall without having a large ball valve sticking into the living space.


From this ball valve we put a small piece of 3/4″ PEX to a 90 Degree Elbow, and then fed it to a water pressure regulator and a water pressure gauge. The regulator is important because it protect your pipes and the tankless water heater down the line. Most water heaters work only within a particular PSI range, and outside of that range, the water heater either will not work or will break. For maximum performance, our tankless water heater suggests 30–80 PSI. A connection to city water can vary greatly in pressure output, so for our safety, this piece was very important. The gauge is used to measure the PSI, in order to make sure it’s within a range that’s required.
After this point, via some more 3/4″ PEX, I connected the water to a 4-port open manifold with 1/2″ ports. When planning out tiny house plumbing, it’s important to reduce the size of the pipes as you run lines to your fixtures because this will increase the pressure those fixtures. If you kept 3/4″ PEX throughout the whole house, your shower and sink would have very low pressure.
From one of the 1/2″ ports, I ran a line of 1/2″ PEX tubing to my own exterior hose bib (or sillcock). This allows me to run a garden hose if necessary. I can tell you, it certainly comes in handy!
From the second 1/2″ port, I ran another line of 1/2″ PEX to my kitchen sink as my cold water supply. From the last 1/2″ port, I ran a line of 1/2″ PEX all the way to my mixing valve for my shower. The third 1/2″ port actually was not used, so I added a small cap to it. This gives me the option to adding another fixture in my house down the road if I so choose with minimal changes to my plumbing.
Side Note: Before any of those connections were made, I added 1/2″ ball valves so that if I need to service one fixture, I can turn off the water supply just to that fixture instead of turning off all of the water to the house.
That entire system took up approximately 3 feet of space, so I used some clips to mount it to a 2×4 that I then mounted onto my studs underneath my kitchen sink. This allows me to access all of these pipes should they ever need maintenance.
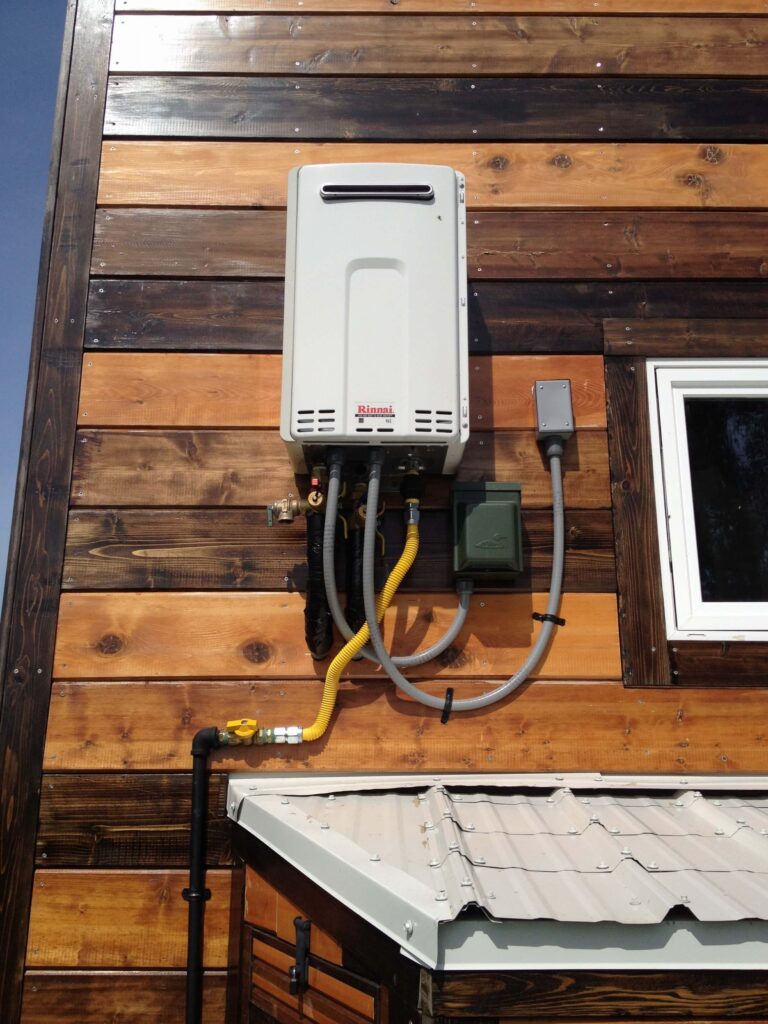
Okay, so from the open end of the manifold, I put another piece of 3/4″ PEX, then another ball valve, then more 3/4″ PEX to connect it to a Corrugated Stainless Steel Water Heater Flex Hose – 3/4” FIPS x 3/4” FIPS x 48″ in length. I also had to purchase a 3/4″ close nipple to attach it to a PEX connector, as the stainless steel did not have a PEX barb connector on it. This connection was also made on the interior of the house, and then the stainless steel pipe was fed through the exterior wall up to the tankless water heater.

You may be wondering why I switched from PEX to Stainless Steel at this point. I did it primarily because of what I read in the instruction manual for our Rinnai tankless water heater. The manual seemed to indicate that I could not connect PEX directly to the unit, and as I recall it stated that I couldn’t have PEX closer than 12″ to the bottom of the unit, so I chose a stainless steel tubing connection. I read terrible reviews on the braided stainless steel hoses, but great things about the corrugated ones, so that’s why these were chosen.
From the stainless steel hose, I connected it to tankless water heater service valve kit as per the recommendation of the Rinnai manufacturer. That was connected to the water heater, and then on the other side the second stainless steel hose was connected and brought back through the exterior wall where it then connected via a close nipple to a 3/4″ to 1/2″/1/2″ PEX tee, and then 1/2″ PEX was run to the kitchen sink and the shower mixing valve.
And that is the entire supply water system!! The tools for PEX are pretty simple for Tiny House Plumbing. You’ll need a pipe cutter, a deburring tool (this is important as it makes the connections more fool-proof), and then either push-fit connections or crimp rings and a crimp tool. A tip on the crimp tool – if you leverage one of the handles against the floor and then push down on the other with your body weight, even someone who weighs 110 pounds can use this tool with ease!
Next, I’ll walk you through our tiny house plumbing gray water disposal system!
- About the Author
- Latest Posts
The DIY Tiny House idea started in 2014. A complete DIY process, Will and Alicia did everything themselves from drawing up the plans, building the framework, electrical, plumbing, and finishing touches and appliance selections.
Over several years, they documented what it was like to live in a Tiny House, conducting very thorough research on how to solve the many issues and problems which come up. In 2019, they sold their Tiny House as their lives continued to evolve and change.
You can continue to follow the lives of Will and Alicia at @ironwillruns on Instagram.


