Starting the project to replace my sunroom windows with low e3 glass was something I had been putting off due to the prohibitive expense. After more than 10 years of living with what was essentially a magnifying glass for heat, the caulking and seals failed and wood had enough sun damage to warrant biting the bullet and replacing all the old glass. I ended up spending almost $25,000 to learn some very specific lessons.

Table of Contents
The Problem With Energy Inefficient Windows
When I first purchased my home with a sunroom, it was a sanctuary bathed in natural light, offering a seamless connection to the outdoors that never ceased to inspire and amaze. Over time, I realized the older 1990’s glass windows were a really bad option. The room was unbearably hot in the summer and cold in the winter, making it essentially unusable for a good part of the year. My AC would run nonstop all day long, with one part of the house being in the 80s and the other part in the 60s.
I tried all sorts of tricks to keep it cool during the 100+ days of summer heat. I Velcroed solar screens to the outside. I tried vertical blinds to keep the room separated from the rest of the house. I filled the sunroom with plants and greenery. None of it really worked.
Even now, I can’t imagine living with this sunroom and not making any attempt to reduce the heat generated. During the worst summer days, it was cooler to open the sliding glass doors and leave everything open while the sun beat down on the glass. Yeah, it was that bad.
I knew if I ever wanted to fully enjoy this beautiful, custom cedar and pine sunroom with its beveled edge design, I’d need to replace all the glass panes with something much more energy efficient. I also knew this would be very cost prohibitive and never worth it in terms of energy savings.
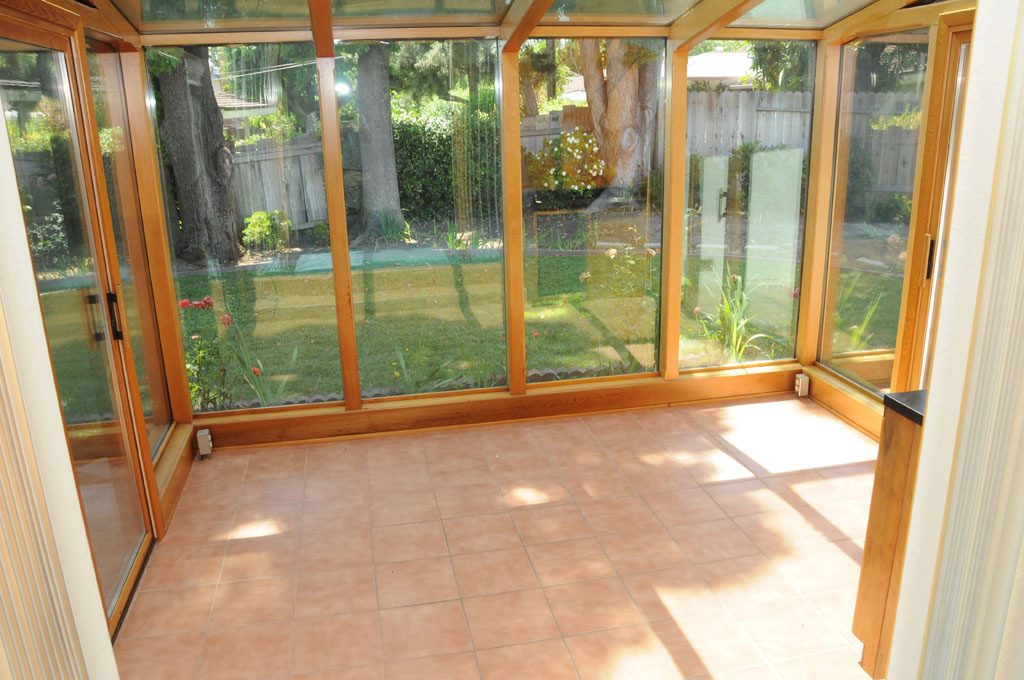
Here’s what the sunroom originally looked like, with 1990s double pane glass. Very energy inefficient.


Finding a Sunroom Window Contractor
A few times I toyed with the notion of replacing the windows and tried to get estimates, which proved to be a huge challenge. There are three big issues in repairing and maintaining a sunroom.
The first, is many companies will only work on sunrooms they themselves have built. This was a custom build and I’m not the original owner, so this option was out.
The second, if these companies were to work on the sunroom, they wanted to rebuild it from scratch. I’d have to get new wood, new glass, new everything. I didn’t want to even entertain this option, as the interior wood was in excellent shape. Even if I browsed options for a completely new sunroom, the quality wasn’t even close to what I already had. I would have ended up in a worse spot and probably been unhappy. I’d be better off to just wall off the house.
The third issue, which proved to be the most challenging to aspect of my sunroom, was I had a glass ceiling. I’ll never think about glass ceiling metaphors the same again. The glass ceiling truly is a difficult obstacle to overcome. As soon as several of the more reputable companies learned the sunroom ceiling was made of glass, they noped out of the phone call consult.
Living in Sacramento, California, I quickly narrowed down what started as a pretty long list to two companies. In the end, the second company declined the work and recommended the other. Many of the other companies also recommended the one I ultimately ended up working with.
Sunroom Windows Project Bid
I know it is good practice to get bids from several companies, but in this instance I had no choice, based on who would actually take on the work. I had the only option, a window and door company over to consult and bid on the sunroom project. I tried to hide the fact I was going to agree to anything they said, because I had no choice.
In my favor, the company was extraordinarily reputable to work with and more than qualified for such a project.
I had to invite the salesperson over not knowing what exactly I wanted done. I knew some of my goals and an end result, but due to this being a very custom job, I wasn’t sure how to get there and had to rely on someone else’s expertise. These are the goals I presented:
- I wanted to replace all of the exterior trim, which was done for, from years of constant sun and heat exposure and not being taken care of as well as I should have – which means painting yearly.
- I wanted new energy efficient sunroom window glass to block out the heat in the summer.
- I wanted to keep the interior look as is.
The salesperson took measurements, chatted about the project, and seemed excited to work on the sunroom windows. It was different than the usual window work and would provide some challenges and a beautiful end result.
Milled Wood Trim
Alongside getting a bid and quote on the glass for my sunroom windows, I knew I needed to replace the exterior wood. I found two companies in Greater Sacramento that offered milling services.
The second choice I eventually figured out most likely subcontracted the other choice. And they were way more expensive, most likely due to the markup on handling the project. This second company also worked with faux-wood products and custom resin.
A lot of this was tempting, but after pricing out custom resin versus wood, both turnaround time and the additional cost made it a less appealing option. I also read numerous reports online, backing up what this company told me at their showroom, is that the pieces break easily when nailing them up, and you need to have plenty of extra on hand.
Considering the custom styling I was already getting into, it sounded like I’d need 30 to 40 percent extra. That was a huge amount of money for broken pieces. But, that’s the nature of resin and faux wood made from compressed volcanic ash.
The first choice, whom I ultimately went with, was Burnett & Sons. The company has been in business since 1869 and have worked on all sorts of historical and significant projects, including the state capitol.
I brought in some samples of the existing wood and measurements of how much linear feet I’d need. Each pieced needed multiple bevels specific cuts to maintain the details. I chose Western Red Cedar Clear for my wood trim, based on the recommendations of Burnett and Southgate Glass.
Total Cost: $1,779.69 for 182 linear feet.
Keep in mind I tried to get the best wood available and had a custom, intricate design. This was far from a flat 1×4 from Home Depot.
I thought about getting the brickmolding from Burnett, but it essentially looked the same as what the glass company sold, and their came pre-painted, which would save me several days of labor.
I was offered the option of changing my mind last minute and going back to Burnett – they always carried it in stock and it wouldn’t need to be custom ordered like the rest of the trim.
Sunroom Windows Quote #1
The first quote I received read as follows:
- 4 IGE8T – IGU 1/8″ LOWE-366 TEMP / 1/8″ CLEAR TEMP 1,305.24
- 6 IGE8 – IGU 1/8″ LOWE-366 / 1/8″ CLEAR PLATE 2,075.82
- 4 IGE8 – IGU 1/8″ LOWE-366 / 1/8″ CLEAR PLATE 1,383.88
- 4 IGE8 – IGU 1/8″ LOWE-366 / 1/8″ CLEAR PLATE 691.92
- 2 IGE8 – IGU 1/8″ LOWE-366 / 1/8″ CLEAR PLATE 224.04
- F10 – TRIANGLE EACH (IGU)
- 2 IGE8 – IGU 1/8″ LOWE-366 / 1/8″ CLEAR PLATE 233.68
- F1 – TRAPEZOIDS (RAKES) IGU’S SHORT LEG @ 11″
- 1 LG1 – SERVICE INSULATED GLASS – MEASURE / INSTALL 2,350.00
- LG1A – SERVICE ADDITIONAL IGU INSTALL
This came to a total of 8,782.11.
This was way less than I originally had mentally prepared myself for. Now, you might be thinking, how did this jump from 9k to 25k as mentioned in the first paragraph. I have one word for you.
Doors.
Sunroom Windows Quote #2
Sunroom Cost and Project Scope
Remove and replace 18 insulated glass units. Remove existing exterior trim and dispose of. Install
insulated glass units from exterior. Use customer provided trim for exterior of all insulated glass units
that are vertical. For overhead units, utilize existing compression strip, no exterior trim necessary.
Remove and replace 2 sliding patio doors using Andersen E Series. Replace exterior trim with 2″
brickmould, pre-primed, supplied by Southgate Glass. Reuse existing interior trim if possible. If not
possible, replace with 2-1/4″ beveled clear pine.
All glass units to be Lo-E 366 / Clear. Tempered safety glass where needed. Overhead glass units to be Lo-E 366 / Clear Laminated safety glass.
Additional charges will apply for repair of dry rot found during the course of installation.
Sealant above: Dowel Corning 795 Structural Sealant
Copper Green on dry rot bottom plate
Chamfer is style of cut on trim pieces. Larks tongue is the type of chamfer/bevel used on beams inside.
- About the Author
- Latest Posts
I strive to paint vivid landscapes with my words, bringing the magic of far-off lands and enchanting aromas to life for my readers. Combine passion for exploration and the art of gastronomy in an unending ode to the senses. When I’m not traversing the globe, I find solace in the earth beneath my fingertips, tending to my garden and working on projects around my verdant oasis. MK Library serves as a beacon, guiding fellow travelers and homebodies alike to embrace sustainability, nurturing both our planet and our souls with purpose. Full Bio.


